|


| |
Introduction
Following is a diagram indicating
the nomenclature and location of major components of a parachute system. For
detailed descriptions, refer to the glossaries on this web site.
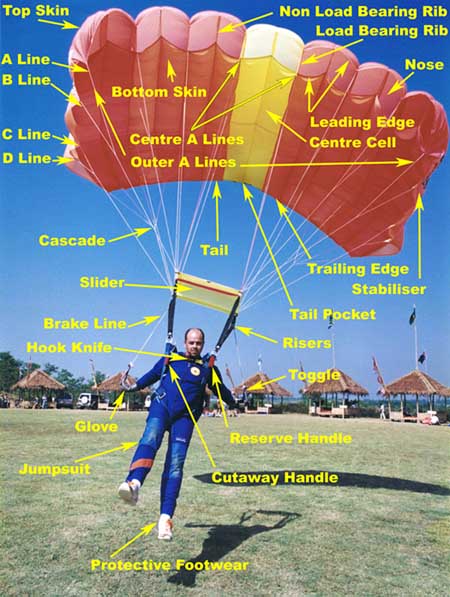
Figure: Components of a parachute
system.
Canopy: Diamant. Container:
Woomera. Parachutist: Tom Begic - Xtermin8 - Australian 8 Way Speed Team.
Location: Lido Lakes, Indonesia -
World Parachuting Championships #6. Photographer: Anthony (Worm) Dorney.
Canopies
It is possible to do CRW on any deceleration device
(parachute). However, there are a many reasons why you should choose CRW
specific canopies if you want to do CRW. Whilst it is perfectly acceptable for
experienced jumpers to do non-contact or very basic contact CRW (such as stacks)
on high performance canopies, the more complex the manoeuvre and the lesser
experienced the jumpers, the less acceptable it becomes to use anything but CRW
specific equipment. Some reasons why you should NOT use freefall equipment for
CRW are:
- high performance canopies not only perform better whilst everything is OK,
but they will also perform more radically when everything is going wrong. In
other words, problems are more likely to occur during minor disturbances of
formations and canopies, and the affect is likely to be exaggerated compared
to a CRW specific canopy. You will descend faster in an entanglement which
cuts into your decision and reaction time.
- most modern freefall canopies have micro-lines. They will cut through
flesh given sufficient force and speed. They are also harder to catch and
hold because they are smaller in diameter.
- they usually have cascaded A lines which increases the chance of getting
feet caught in lines. This increases the chance of canopy airfoil
distortions which in turn increases the likelihood of radical movements. Our
aim is smooth, not radical.
- very few freefall canopies have bridle retraction systems. This means more
exposed equipment and a higher likelihood of entanglements.
- longer suspension lines means its more likely that the suspended load is
more likely to rotate if subjected to the appropriate forces. In other
words, a side on dock is more likely to lead to spiralling line twists. And
this is not that much fun on small elliptical canopies.
Seven cell rectangular canopies are preferred over nine
cell elliptical canopies. This is due to the aerodynamic requirements of CRW
canopies. They must be able to maintain adequate pressurisation during docking
manoeuvres and when portions of the nose are blocked off by the bodies of other
parachutists, re-pressurise after deflation, be more stable when subjected to
impact forces or under the influence of turbulence, be responsive enough to be
able to respond to inputs quickly but not too responsive such that the slightest
distortion will create a massive deviation in its performance, etc.
????? Need more work here! ?????
If at all possible, each parachutist in the formation
should match the following variables with one another:
- canopy cell structure (standard seven cell preferred).
- compatibility of all canopies in a formation:
- airfoil (manufacturer/model/design).
- aerodynamics.
- wing loading.
- plan-form area.
- cross-porting. Cells should have several cross-ports to promote
airflow (hence pressurisation) between adjacent cells. This should be
done according manufacturers specifications.
- brake settings.
- age and deterioration of canopy material.
- canopy fabric.
- bridle length.
- pilot chute retraction system.
- flying characteristics (descent rate, forward speed, stall point, etc).
- flying styles of parachutists in the formation.
- should spread arms and legs the same such that drag due to surface
area is equal.
- brake input should be consistent throughout the formation.
- body position is important, especially in large formations.
- suspension lines
- direct lines for centre and outer A lines (no cascade).
- colour coded centre & outer A lines.
- trim.
- line length & gauge (thickness).
- line material.
- slider dimensions, position and collapsibility after deployment, and
style.
- harness closure (how loose tight, how far apart the risers are spread as
this alters the aspect ratio and flying characteristics of a canopy, etc).
With all that in mind, if you want information about
specific CRW canopies, go to the CRW Canopies page.
Deployment & Retraction Systems
Deployment
CRW jumpers tend to use pullout or throw-out deployment
systems. There has also been many other techniques used including the
"spit-out" (both toggles in hand, pilot chute in mouth, jump, spit. .
. . . . etc).
The pull-out system: the parachutist grabs the
handle and pulls it into the airflow beside him. As he pulls, the container is
opened and the pilot chute is pulled out of the container. The pilot chute
inflates more rapidly using this method as the pilot chute is correctly oriented
to be exposed to the airflow. Unless you drop the pilot chute in your burble,
this method promotes a faster deployment. One drawback is that is the handle is
usually on the bottom of the pilot chute, the pilot chute cannot be pulled
through the rings and collapsed. This can be overcome by relocating the handle
on the top of the pilot chute, but then you lose the benefit of immediate pilot
chute orientation and exposure to the airflow. The retraction is more important.
The throw-out system: the pilot chute is pulled out
of a pocket external to the container (usually BOC) and thrown into the air
flow. It re-orientates itself to achieve air flow exposure and pressurisation.
Then it pulls the pin on the main container and opens it. The pilot chute can
easily be retracted through the rings using this system as the handle is located
on the top of the pilot chute. The drawbacks of this system is less reliability
with pilot chute pressurisation (very relevant for base-pin height
differentials), and the possibility of main pack closure.
Some teams have placed the handle on the bottom of the
pilot chute to promote pressurisation and canopy extraction.
Several things are important for deployment systems:
- they must be consistent and reliable in terms of times and heights
consumed during the deployment process.
- the pilot chute must have sufficient drag to get the canopy to line
stretch quickly.
- the bridle must be long enough to clear the burble behind the jumper.
- they must be fully retractable such that they don't interfere with other
parachutists or their equipment and the performance of the parachute.
- they should be user friendly in terms of packing effort and knowledge and
practical use.
- they should be relatively easy to replace &/or repair in the field.
Retraction Systems
One of the greatest dangers in CRW is equipment
entanglements. If using standard skydiving equipment, the bridle is the most
likely piece of equipment to get tangled, especially when one canopy moves
behind another. Hence, systems have been developed that retract the bridle and
pilot chutes out of the way of other parachutists. These systems also deflate
the pilot chute so that it does not affect the flying performance of a canopy.
Rings are the most common retraction system. They
allow the bridle to run through rings placed across the span of the canopy.
There are usually four rings. Two are at the centre cell attachment, and there
is one each two cells away from the centre cell. The bridle is run from one
centre cell ring to one side cell, back over to the other side cell, and then
back through the second centre cell ring. The length of the bridle is determined
by the distance between these rings when the canopy is fully pressurised in
flight. The bridle is usually made a little shorter than the distance described
above so that the pilot chute is drawn into the second centre cell ring and
therefore collapsed. It is usually shortened a little more than the radius of
the mesh material on the pilot chute.
There are other retraction systems that pull the pilot
chute and bridle through the canopy.
Harness & Container
- large grab soft toggles. Should have a large toggle loop that forces the
loop to expand or open so that they are easy to locate and grab. Soft
toggles are less likely to get caught around lines and are easier to locate
and grab when you are in a hurry moving from one control input to another.
- larger riser covers. Due to the increased bulk of CRW riser grips
(especially the front risers), many standard skydiving containers cannot
cover and/or hold the risers in properly.
- protected reserve flaps and pins. Due to the possibility of lines catching
around exposed flaps, it is beneficial to have tuck in and protected flaps
on the reserve.
- do not use containers that have obvious catch points such as cut in
lateral harnesses,
Set-up & Configuration
- Brake Settings
- Toggle Settings. Its a good idea to get longer toggles with a larger loop
(perhaps with two loops). This is for several reasons. The main one is so
that they are easier to find whether you are looking at them or not. The
second reason is to counteract the affect toggle in hand front risering has
on brakes.
- Riser Grips. Front riser grips are a critical component of CRW equipment.
The aim is to be able to grab your front riser and pull down on it as
quickly as possible. Depending in your ideal reach whilst under canopy
(related to your arm extension, strength, riser dimensions, etc), you should
locate the point on your risers where it is easiest for you to grab and that
you can get maximum affective leverage. Some form of blocks or grips located
at this point will assist with easy gripping. It may be something as simple
as an L-Bar sewn into the riser that is covered by grip tape (vet wrap or
tennis raquet grip).
- Front Riser Pulling Aids
- these are very beneficial for formation jumps where you expect to be
occupying one slot for a period if time or for CRW camera persons. Examples
include the wing slot and setup positions on large formation jumps. They
allow a constant front riser input without much effort. It also means that
you wont be pulling down on your toggles at the time. If you have a short
toggle to brake setting length, you usually apply some brake by default
every time you pull down your front risers (assuming you keep your toggles
in hand). This means that your front riser input is less affective as it is
counteracted by some braking.
- Bridle Settings
- Types of Deployment Systems
- Types of Retraction Systems
- Tail Pockets. These were developed in lieu of d-bags and tray
packing. They make it easier to stow lines and actually assist in improving
heading rates. It is less likely for line twists to be induced on opening by
a complete canopy spinning than a d-bag. They also make it easier to retract
the deployment equipment (bridle & pilot chute) as the obstacle of a d-bag
is removed. Bag lock malfunctions are eliminated. But it is still possible
but less likely, to get a tail pocket lock malfunction. They also accelerate
the canopy extraction and line stretch process which may be a good or bad
thing depending on how good your back is.
- D-Bags. Are generally not used as its benefits (slower openings
and making the pack job easier) are far outweighed by the benefits of the
tail pocket.
Containers
- AAD's should be considered carefully. Whilst it is acceptable to use
- no SOS systems.
- no RSL systems.
Accessories
- Hook Knife is compulsory - multiple knives are preferred - consider mounting locations.
Most likely to be used in an entanglement.
- Altimeter (Visual, Audible) provides valuable information for emergency
decision altitudes, break off height, docking decisions, etc.
- Headgear (allow for hearing)
- Timing Device
- Tertiary Parachute
- Weights
- Jacket
- Pouch
- Clip on (tertiary / D ring mounted)
- front riser trim tabs to assist with controlling descent rate and forward
speed.
- cross connectors are useful when building planed formations, especially
large ones. They are not necessary for offsets and stacks or faster CRW
disciplines such as rotations. They should be connected between front
suspension lines and rear risers.
Jump Attire
The critical factor is protection of body parts from
abrasion from rapidly rubbing suspension lines. The hands and feet are most
commonly affected. The climatic conditions, and altitude must also be
considered. CRW jumpers spend more time in the air than free-fallers, this is
especially relevant at high altitudes in cold climates.
- Jumpsuits
- Shoes
- ensure no catching components such as hooks are exposed.
- Socks (ankle covers).
- Gloves
- Goggles / Sunglasses
Spotting Aids
- Measurement devices contained within the aircraft
- Altimeter
- GPS
- Air Speed Indicator
- Compas
- Maps / Aerial Photographs
- EYES
- Wind Socks & Other Wind Indicators (clouds, trees, water, smoke, WDI,
etc)
?????
Aircraft
- Exit Airspeed
- Centre of Gravity
- Stall Speeds
- Forward Throw
- Turbulence from Prop Blast
- Dead Air on Tailgates
Following are notes & other ideas relevant to
this section that require further development. Please ignore.
- there should be no protrusions that may catch onto equipment whilst
performing CRW, this includes hooks on boots, devices mounted on the arms
(watch, altimeter, jewellery), jewellery, etc.
- adequate limb coverage should be worn to prevent friction burns and damage
to lines (socks, boots, gloves, long sleeves, etc)
- e. cross connectors
- (1) A secure foothold at the top of the risers is essential for
building planes, which can develop greater tension as they grow larger.
- (2) Cross connectors should be attached between the front and rear
risers only, not from side to side.
- (3) Side-to-side cross connectors can snag on the reserve container
during deployment and cause a dangerous entanglement.
- section on basic knots required in CRW
- how to connect & disconnect gear
- how to do a line check
- how to untangle lines
Riser grips - front and rear
AAD's - comments on types, RSL's and other safety
equipment,
whatever system you use, you have to ensure on headings
as the risk of opening collisions can be high. People have died from collisions
on opening.
Graphics of equipment and components.
- finding root cause of problems
- pilot chute hesitation
- low snatch force
- excessive opening shock
- controlling opening shock
- off headings
- body position
- worn toggle/riser velcro leading to premature release
- tripped on way out of the plane by other people or aircraft
components
- turbulent prop blast
- lines packed hard up against reserve in pack tray
- worn or uneven stowage bands
- erratic or chaotic pilot chute inflation and canopy extraction (i.e.
spinning p/c)
- asymmetrical deployment equipment (p/c attached off centre to
bridle)
- premature toggle release
- line dump
- pilot chute in tow
- end cell closure or slow pressurisation
- trouble shooting guide
- canopy incompatibility when wing loading is similar
- age difference = variable porosity & line trim
- brake settings
- flying style
- variable materials (different batch) used in construction - a
serious team should use the same material if possible
- in built turns
- uneven pressurisation -> off headings and turns
- varying response to similar

|
